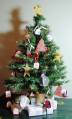
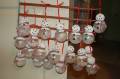
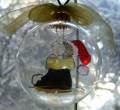
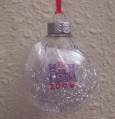
These are mini snowmans that the kids and I made for their classes last Christmas. We really enjoyed making all 45 of them. Lots of work but worth it. They are very easy to make. I picked up these 2in glass balls in the clearance section the year prior for 25 cents for 6 so needless to say, I bought about 15 boxes of them..I still have some this year. Then went to the dollar tree to get the styofoam balls 6 for $1, rather than paying $4 for 6 at Michaels for the use of the heads. We took the clear balls, filled them with Buffalo snow just enough to make it look glittery, then pushed alittle bit to put the head on (took off then we had to hot glue to head back on to the ball)..painted all over the head with the SnowTex and just below the neck. Added eyelets for eyes, and pipecleaner for the nose (I painted the pipecleaner orange, because I didnt have orange) cut to about 1/4 inch. I used Black tulip paint for the mouth. Add buttons, and a scarf around the neck. I alsmost forget to mention, get a Christmas ornament hook and secure it to the top of the ball (head) with hot glue. Everything was added using the hot glue gun. The boys really enjoyed making these for their classmates too. Everyone still talks about them to this day. They signed each one of them on the back with the year. Now, we are thinking what should we do this year. TFL!
Bonnie
Date: Saturday, September 22, 2007 GMT Views: 5871
Favorited:74
Registered: July 22, 2006 Location: Tampa, FL Posts: 2288
Sat, Sep 22, 2007 @ 2:05 PM
OMGosh! How adorable are these?! I am so going to do this for my kids' classes this year! They are perfect! I don't have to worry about which holiday everyone celebrates! It's a winter craft! O.k., so not many snowmen in FL, but still...! Thanks so much for posting the directions! These are going straight to my faves!
------------------------------ Elizabeth Proud SU! demo since 2006! my SU! website my blog
SCS Fan Club Member
Registered: December 8, 2006 Location: currently stationed in Norman Oklahoma Posts: 11275
Sat, Sep 22, 2007 @ 4:36 PM
Thanks for the comments. If anyone is interested in the instructions more clearly, email me at [email protected]
Thank!
Bonnie
------------------------------ Bonnie~Proud Fan Club Member~Marine Wife My Gallery~One of Kota's Kids My Blog~Bonnie's Creative Corner Every Job is a Self-Portrait of the Person Who Did It. Autograph Your Work With Excellence.~Author Unknown
Registered: January 29, 2005 Location: Canada Posts: 736
Sat, Sep 22, 2007 @ 6:26 PM
Very creative. What a wonderful project for your kids too.
I wonder if you could use an old lightbulb for the base and get a similar effect and recycle at the same time
I may have to give it a try.
Thanks for sharing!
These are just the cutest. I cannot believe you made so many, good for you. Thank you so much for sharing the directions. I do an ornament exchange with a group of friends and these would be perfect. TFS.
Registered: December 8, 2006 Location: currently stationed in Norman Oklahoma Posts: 11275
Tue, Sep 25, 2007 @ 10:26 AM
I wanted to share with everyone. I entered these glass ornaments into a craft contest. I WON! I won $15..Hey, its not much, but I'll take it..I got my check today.
Bonnie
------------------------------ Bonnie~Proud Fan Club Member~Marine Wife My Gallery~One of Kota's Kids My Blog~Bonnie's Creative Corner Every Job is a Self-Portrait of the Person Who Did It. Autograph Your Work With Excellence.~Author Unknown